Introduction:
Many people opt to install their Starlight Headliners rather than hire a professional since the method is straightforward. Look no further if you need a place to get your starlight headliner put in.
How can you find a place to get a Starlight Headliner put in my car?

Each car has a unique procedure for installing a starlight headliners. This post, however, intends to provide a basic overview of the starlight headliner install procedure. If you need help with something particular to your car, like removing the headliner or getting it out of the car, look for threads on automotive-focused message boards.
-
Equipment
The equipment you’ll need to remove the headliner from your car is model-specific. For a standard starlight headliners installation, you advise using the following equipment.
Needed Equipment:
- Toolkit containing screwdrivers
- Wrench and socket set (for a 1/4- or 3/8-inch ratchet)
- Long-term trade or the Pen
- The T-Pins for Upholstery
- Super Glue or another contact adhesive
- Tape used in electrical work
- Blades of Shears
Extra Suggested Resources:
- Toolkit for Removing Auto Interior Trim
- Tape measure
- Electric Drill and Assortment of Little Bits
- A powerful glue gun that uses hot glue
- Pliers with a spring-loaded end cutter and a flush-cutting blade
- Remove the fuse and tap it.
- Moreover, Wire
- Tools: pliers and wire cutters
Step 2: Headliner removal
You may need specialized equipment to remove the headliner in your car because it will vary slightly from vehicle to vehicle. In most cases, the headliner cannot be removed from the roof without first removing the pillar covers, sun visors, map light, dome light, and roof handles, so it’s a good idea to learn about the procedure and any special equipment you may need for your car.
One of the trickier steps in starlight headliner install is removing it from the car. It may be necessary to remove seats and use special equipment to remove the headliner from the trunk or one of the passenger doors of some automobiles. Some vehicles’ headliner panels can only be removed in tandem with the front or rear windscreen. This can make for a tight working space, but it is still a common starlight headliner install method.
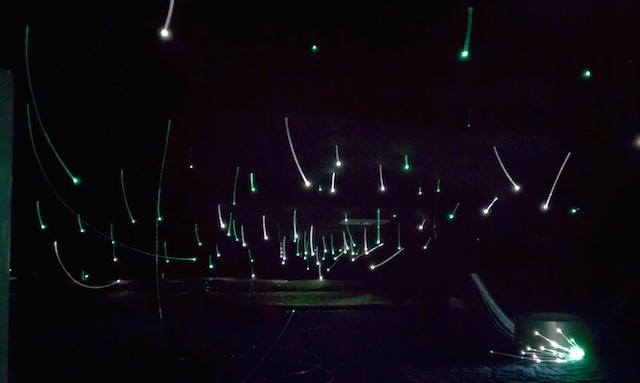
Step 3: Plotting stars
If you take the starlight headliner off your car or your roof, you may use the top of it to map out your constellations. Cleaning up the headliner may require the elimination of surplus plastic and foam. A good star cape may be difficult if many of these components are in the way. If you want to draw a grid on your headliner, you should begin by locating the center of each of the four sides. Put a dot in the center of each side and draw a line to connect them.
The next step is to continue subdividing the starlight headliner into grids of decreasing size until you reach a manageable section size. Begin by sketching out the sections of the grid where you intend to put lights. The total number of lights in your kit can be divided by the number of grid sections to give you the number of lights in each grid. A headliner with 16 segments and 500 lights would have about 31 in each piece.
Step 4: Making holes
The next step is to use upholstery pins or a drill to create holes in each designated location. You need to ensure they’re just big enough to accommodate the fiber optic lights when sung through. Methodically punch holes in your grid until it’s complete.
Step 5: Determining the Light source location
Choose the ideal spot for your light fixture before beginning the fibre optic installation process. Think about the size of the light engine, the length of the power cord, the length of the fibre optics, and whether or not you have room to run the optics out of the starlight headliner when deciding where to put the light source.
Some kits have small enough engines to be installed in the car’s headliner, while others require more robust power sources and must be placed in the trunk, behind the seats, or beneath the dashboard. Plan the route of the fiber optic lights through the pillar(s) to the light source, and make sure you have enough length in the fiber optics to reach your light source’s location if the light source needs to be moved to a different section of the car.
Step 6: Setting fiber optic lights
First, install the fibre optics directly illuminated by the light. Optics must be routed from the headliner to the dashboard or ceiling, so begin at the area of the headliner that is closest to the destination. For instance, the area behind the C-Pillar should be the first to be covered if electrical work is to be done there.
When beginning to lay lights, you have two options: punch them through the starlight headliner cloth and cut off the ends, or fit them so that many lights stop before piercing through the fabric. Each method has advantages and disadvantages; punching the lights through will produce a brighter final product, but setting them behind the material will provide a more subtle look.
Step 7: Replace the ceiling and wall trim
You should perform a bench test of your setup before reinstallation to guarantee that the star headliner is illuminated properly throughout. When you’re ready, put the headliner back in the car the way you took it out. This job is easier with a helping hand, given the added weight of the fibre optics and the lightweight engine. Finding the tab areas on the ceiling ahead is important, so you know where to push for each headliner.
When restoring the interior trim, ensure the wiring for any lights added outside the headliner has been routed back inside.
Step 8: Connect the wires and finish the assembly
If your lights have pierced through the headliner, you can trim the excess fibre optic with flush-cut pliers or scissors. The wiring of your light engine for power can take several forms. Most sets will include a cord to connect to the cigarette lighter in your car.
Conclusion:
A wide variety of online and offline auto accessory retailers sell Starlight headliners. Buying from an online store gives you access to a broader range of products and pricing options, allowing you to quickly narrow down your options and zero in on the best option. While shopping online, remember that not all stores are legitimate. Thus, it’s crucial to only buy from trusted stores
Visit here:. Ureadit.Com


